Tag: actionscript 3

StateGroups – finally found a use for them

StateGroups – finally found a use for them

State groups? Ever looked at them and though they look really useful but then can’t find a good use for them!
Well last year (yes its taken a while to finish of this post – hopefully its worth it), while developing some mobile apps I came across a great use for them. At the time their were also very few examples of using stategroups on-line and none in a practical setting.
So here goes, lets see how they’re done and where would be good to use them.

  • The problem
  • Mobile apps can have 1 of 3 DPI settings and this will change how your app looks. (320 DPI, 240 DPI and 120 DPI).
    So we can think of each of these DPI’s as a state.
    Then we can have a view and like most views you will use states. For example to have “Edit mode on” and “Edit mode off”.

  • That give is 2 different groups of states
  • Group 1 is the DPI setting.
    Group 2 is the view mode.

  • Soloution
  • I always like to see working examples of something, bit like a picture & a 1000 words.
    So below is a test app to change the values of and of course it has source code to view.
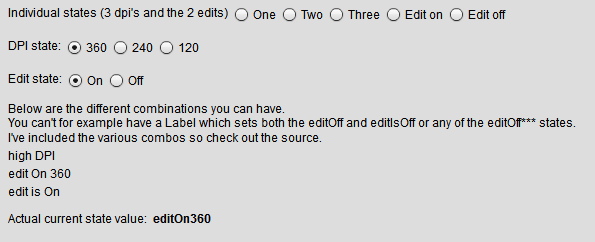

Click to open state group examples

I’ve also included below what I consider to be the important bits of the code to understand.
Check out the source code of the app for more detail.


These are the various combinations of states you can use together, and the list of the actual states.
For example you can’t set text.one and text.lowDPI on the same component.

Hopefully this will give you a bit of insight into how and where to use stateGroups. Very useful tool under specific circumstances.

[ad name=”ad-1″]

Show dual coloured highlight for a DG

Show dual coloured highlight for a DG

If you have a datagrid that has different coloured columns, then why should you have to do with only using a single colour for the highlight.

Below is a simple soloution using actionscript to solve this.

First I should state that you need to use the AdvancedDataGrid even if you only need a normal DataGrid.  This is because the AdvancedDataGrid has a method called drawHighlightIndicator(…), which as you’d expect from the name draws the highlight.  Normally this is a single colour, but with a little overriding you’ll be able to change this.

Below is the main snippet of code from the extended AdvancedDataGrid.

override protected function drawHighlightIndicator(  indicator:Sprite, x:Number, y:Number,
	width:Number, height:Number, color:uint,  itemRenderer:IListItemRenderer):void
{
	//The indicator is the highlight, so grab its graphics and clear them
	var g:Graphics = Sprite(indicator).graphics;
	g.clear();

	var xPos : Number = 0;
	var yPos : Number = 0;
	//loop through the number of columns in the datagrid
	for(var i : uint = 0; i < this.columnCount; i++){
		//get a random colour
		g.beginFill(randColour);
		//draw the rectanlge that fills the first column
		g.drawRect(xPos, y, this.columns[i].width, height);
		//update the starting X position so that it starts at the begin of the
		//next column
		xPos = xPos + this.columns[i].width;
	}
	g.endFill();
}

using the above you could create a DataGrid like the below which has some left hand columns in light purple and the rest in white. Then on highlight that same light purple colour is used for the white cells and the existing light purple becomes a slightly darker purple.

Twin DG colour example

Check out this link to see a very simple/colourful demo. As ever right click app for full source code.

[ad name=”ad-1″]

Flex & Version control

Flex & Version control

Ever had a project where your client has some kind of odd/unusual caching issue with their servers that you have absoulutly zero control over?

Well if you have (which I have had) then the following swc file may help you to diagnose the problem. Its a very simple swc file that you can place inside your code and pass it a version number. Next time you build your app and deploy it to your clients servers you can type ‘version’ then whatever number you gave inside your code will appear inside an Alert box.

This has helped me sooooo many times, as after deploying some code, if they (client) appear to be seeing something different to what I’m seeing then I can get them to type ‘version’ and if it’s the old version number I have to tell them to clear their cache & wait for their internal servers to refresh (again I/they have no control over this), then a few hours later they will have the correct version.

So it just helps when you roll out a minor update and you say its fixed, then they come back and say that they can’t see the changes, you can then show that its the internal hardware and that they just have to wait to get the new swf.

As a little extra feature on the version SWC I’ve given it the ability to listen to your own functions should you wish. It works by listening to the keypress event on the stage (so their is nothing visual to worry about). By default the version number is shown by typing ‘version’ when the app has focus. If you wished it to do something else on a certain word or set of key presses (a-z, 0-9) then you would do the following:


//There is a addKeyListenerFunction and a removeKeyListenerFunction
addKeyListenerFunction('whateverSetOfKeyPressesYouWantToListenTo', someFunction);
//remove listener by passing in the word that you where listening for
removeKeyListenerFunction('whateverSetOfKeyPressesYouWantToListenTo'); 

Click here for runnable demo, right click for source code. (just make sure app has focus for it to work)

If you’re interested in file size, using the above example with and without the version SWC changed the file size by just under 3K (3057 bytes).

The version SWC is case insensitive, so if you ask it to listen to HELLOWORLD, this is the same as helloworld.

Get the SWC file here.

[ad name=”ad-1″]

Simple tip #1 – custom events

Simple tip #1 – custom events

Today while coding I was creating some classes that required them to dispatch custom events. I know that this is a fairly common thing to do but sometimes it is these little things that can trip you up or take a while to find out how to do them.

So I thought that each time I come across something that is ‘simple’ (only simple after you know it!) that I’ll try to create a quick blog entry and take note of it.  Each time I create a new ‘tip’ post I’ll link it to the previous/next tip so that it will be quick and easy to browse through a load of tips.
 

Tip #1

So for my first tip, this is how to implement your own custom events.

First if you are firing the events from a custom MXML file then you need to create a metadata tag. I make this the first node inside the MXML file.  For example:


	[Event('next')]
	[Event('previous')]
	[Event(name='jump', type='com.kennethsutherland.events.JumpEvent')]

...

If your custom class is an AS3 file then you would put something like the following are the imports

[Event(name="previous", type="flash.events.Event")]
[Event(name='jump', type='com.kennethsutherland.events.JumpEvent')]

Then inside the MXML file (script block) or anywhere in the AS3 file to fire the event I’d do the following:
 

//custom event, the extra value is handled by the JumpEvent class
dispatchEvent(new JumpEvent("jump", specificValueForTheJumpEventClass));
//standard event
dispatchEvent(new Event("next")); 

If you do the above and lets just say your MXML/AS file is called ‘GreatComponent’ then in order to use the new custom event, its as simple as the below bit of code. 


That’s it, now you can fire of any custom event that you wish and make sure that it gets listened to.

Next Tip


[ad name=”ad-1″]