Author: Kenneth

Desktop backgrounds – Random non code post

Desktop backgrounds – Random non code post

Yet again I give my blog so little time, but during my coding I see my desktop wallpaper which I think is dead nice – well I did take the picutres 🙂

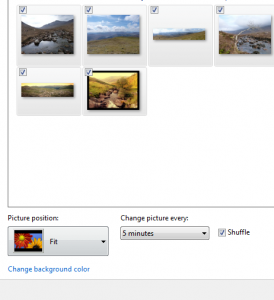
So I’ve bundled some of them (13 images) up into a theme pack for windows machine –

Thistle at Ben Lawers
walk through Ben Lawers national nature reserve
Garbh Uisge Mor (NE of Ben Macdui)

If you like that sort of pics them feel free to grab the theme and use it. themepack link
If you really like it you can follow my pics on Flickr
IF YOU REALLY like then 🙂 then you can even buy them!!! (only just start putting some up on to Redbubble so not many yet – need to get my walking shoes on a bit more) Redbubble

These were just taken as part of my drive to get out from my desk… so enjoy and feel free to comment and share if you like 🙂

Double click the theme pack download file and windows will do the rest.
Then go to your Control PanelAppearance and PersonalizationPersonalizationDesktop Background then tell it to ‘FIT’ and not ‘FILL’ as that’s what seems to be the default setting.
fit

[ad name=”ad-1″]

Email settings with a Buffalo linkstation NAS

Email settings with a Buffalo linkstation NAS

So I got myself a new Buffalo Linkstation for backing up a heap of data and part of its software features give you the option to send an email in case of hard drive errors or failure.

Fail, Fail, Fail again…

Well going through the options and trying every possible combination failed.

Double checked email ports/passwords/auth settings etc with my mail client settings and with the Godaddy help – nothing worked. Every test email failed.

Eventually I figured it out so thought I’d put this post up as it was a really simple solution – DO NOT EMAIL YOURSELF.

So I was sending the email from say [email protected] and sending it to [email protected].

This failed to send! No idea why but it did. After a while I decided to send it to another of my emails at a different domain – [email protected]. THIS WORKED!

I then added both email addresses to send to – [email protected] and [email protected]. This also worked.

Most odd, but hopefully this will help someone trying to figure it out.

Sencha Touch books – Cookbook

Sencha Touch books – Cookbook

I started to look into Sencha touch ‘seriously’ about a year ago.  Having spent a short while on it about a year ago with the intention of doing a lot more – but as ever time flies on by. I now have 3 Sencha touch books and I’m getting my head back into Touch (and Ext JS) so thought I’d review the books to advise how good or not they are.

The first one is the new Sencha Touch Cookbook 2nd Edition. I may be an experienced programmer with Flex/Actionscript but when it comes to Touch I’m definitely a newbie. So if you are looking to learn Touch then you’re probably in the same boat as myself. So is it worth getting or not? That is pretty much the main question and from what I’ve gone through I’d say YES – if you’re a beginner or maybe even an intermediate that is.

Why?

Well if like me you can’t stand config and you want to get into the code as soon as, then the initial part of the cookbook comes with some of the following

  • Setting up the Android-based development
  • Setting up the iOS-based development
  • Setting up the Blackberry-based development (not quite sure how useful this will be now 🙂 but its there anyway)
  • general config and detecting features

It also shows you how to set up for tools such as Eclipse and running the code in a simulator. Again if you’re new then this will save so much time as config can be hit or miss when you’re not sure where to start and just wish to get going.

What I did find odd was that at the start of every recipe it had a ‘Getting ready’ section that pointed you to chapter 1 to get things set up.

Most of the recipes did have a ‘How it works’ part which focused on the parts of the code which make that particular recipe work and on the whole they add to the learning from the book. As an experienced programmer I know that there is more to code that just writing small snippets that do stuff and I’d have liked to see some best practise code examples. When doing something new its all to easy to get into bad habits because it works and next thing you know you have spaghetti and unmaintainable code! Sencha have created a great way to write Javascript in a OO way that helps you keep it organised and structured, so it would be great to see a few good/bad examples highlighting the common mistakes that developers make. But I suppose that sort of guide might not necessarily be for a cookbook.

For a recipe book it covers a fairly wide range of topics. Charts, videos, offline storage, Google maps, taking a picture, XML etc so it covers a large enough amount of topics to help you get started.   Overall its a recipe book, so its code is short snippets that doesn’t  really need to show best practise but it does show you how to do things.  So what I found myself doing was flicking through some of the examples in the book then I went to get a more in depth explanation elsewhere.

Conclusion

I liked it, but its not the only book that you will need should you wish to get into Sencha Touch, but certainly worth getting alongside a reference book.
Sencha Touch Cookbook 2nd Edition

 [ad name=”ad-1″]

Ext.ComponentQuery.query or Ext.getCmp

Ext.ComponentQuery.query or Ext.getCmp

When you start with Sencha touch, one of the first things you have to find out is the difference between the following.

Ext.ComponentQuery.query or Ext.getCmp?

Well both do a similar task and yet both are very different. When using them in your Sencha App they will return an item from the visual onscreen assets depending on the parameters you give it.

Same, but different.

Ext.getCmp

will return you an item matching the id you passed it. This will be the fastest method to return an item. All items when created with an id are registered in a single object using their id as a key. So Ext.getCmp( myId) will look up and return theRegistrationObject[“myId”]; So it will be very quick. At the same time its benefit is also its downside. Let’s say you have two components and both have the same id then what happens? Well last in wins. So you might not get back what you where expecting.

Ext.componentQuery.query

This is where Ext.componentQuery.query comes in. It will return an array of items, but it works in a slightly different way. Instead of pulling an item directly from an indexed array (which is dead fast), this will traverse the visual items and create a collection depending on what parameters you give it. If you’re application is really large then this is (potentially) going to be really slow.

In order to make sure its not slow you can pass in a very specific path to get at where your component is located.

E.G. Ext.ComponentQuery.query(
'formpanel selectfield[itemId=dataFilterType]' )[0].getValue();

This will return all selectfield’s that have an itemId of dataFilterType and are children of formpanel. If you know there is only one of these then you can reference the first item in the array and then say gets its value.

I suppose for testing/debugging purposes you should also add an alert/console message if if it returns more than 1 item and you only expect it to return 1.
Might be interesting to see some timings on these calls but that’s for another post.

Update –
Check out this screencast by Jay Garcia on the subject. Plus he explains quite a bit more.

Sencha, Architect, Package, APK

Sencha, Architect, Package, APK

First of all, can I just say AAAARRRRRGGGHHHHHHAAAARRRRRGGGHHHHHH.
Good that’s out of the way. Now shall I state what I had to do to get a build to work from Sencha Architect to generate an APK and then to put said APK onto a Nexus 7. All of this was done on a windows 7 machine using Sencha Architect 2.1 and Sencha Cmd 3.

What versions of the software you are using is very important and there are numerous posts about this stuff and they all differ depending on what versions you are using. It would appear like the very rapid pace at which Sencha are moving is creating lots of legacy posts with outdated information. So chances are this will be outdated soon as I believe Sencha Architect 2.2 isn’t that far away. Maybe this guide will still work, maybe it won’t…

Instructions

So you’ve created an app inside Architect and you’d like to see it on your Android device. Well USB debugging isn’t possible and depending on your setup you may be able to connect to your local server using the wireless features of the Nexus to see your app inside the browser but I wanted to see it as a native app. So here goes…

      1. Download the Android SDK – http://developer.android.com/tools/index.html
      2. Once downloaded, you extract it to any folder you want and inside the extracted folders you will find the file ‘SDK Manager.exe’  This will be located in the root folder of the extracted files.
      3. Run the manager, for two main reasons.
        1 – You need to download the specific drivers for the Nexus.
        2 – You will need to download other versions of the Android SDK.  (Nexus can use up to 4.1.2, current default downloaded version is 4.2)
      4. Make sure that the drivers for the Nexus are updated – They will have been downloaded to ‘{your Android SDK directory}sdkextrasgoogleusb_driver‘.  Use the system manager if required to install them.
      5. Add the platform tools folder to your PATH inside the ‘environment variable’ section of windows control panel.  This folder can be found at ‘{your Android SDK directory}sdkplatform-tools‘. It contains the adb.exe file that you will call from the command window later to pass the APK file to your Android device.
      6. Next we need to create a key/certificate which will allow the APK to install on a device. Open a command window and paste in the following. Feel free to change the values like ‘my-release-key.keystore’ to ‘yourAppKey’ and so on, but if you just want to see something on your device it really doesn’t matter (keytool is part of the java jdk ).
        keytool -genkey -v -keystore my-release-key.keystore -alias alias_name -keyalg RSA -keysize 2048 -validity 10000
      7. Now we need to configure the Packager inside Architect.
        Hopefully I’ll not miss anything out here, but just give you the minimum amount of changes required.

        1. Update the “inputPath” to where ever the project is saved (doesn’t have to be the web app directory like a lot of examples say). Also VERY IMPORTANT – as I’m using windows when entering in the path make all slashes double. E.G. the path ‘C:myProjectsfirstTouchApp’ should be entered as ‘C:\myProjects\firstTouchApp’.
          Fail to do this and you will get the following helpful message.
          [ERR]
          JSON format error, please verify syntax
        2. Do the same with the output folder, place this anywhere other than the input directory.
        3. I changed  “configuration” to be “Production” so that I could get a better idea of how the app performed
        4. “platform” to  “Android”.
        5. “certificatePath” to where ever you saved your keystore file (give it the folder, not the file name).
        6. “sdkPath” to where ever you extracted the sdk E.G “C:\{your Android SDK directory}\sdk”.
        7. The androidAPILevel is a value that will determine what SDK the builder will use. Default value is 8 which is for Android 2.2x, so if you don’t have that SDK you will get the error
          [ERR]
          Error: Target id is not valid. Use ‘android.bat list targets’ to get the target ids.

          Check out this page for which version number you should use – http://developer.android.com/guide/topics/manifest/uses-sdk-element.html
        8. Now go hit that build button 🙂

Up pops a cmd window, with a bunch of paths and commands. Fantastic, no errors it must be all good.

Yes I go to the output folder and there is the new APK file. Great…

Now open a cmd window again and so long as you’ve set up your Nexus for development ( see here if you have issues with the following – e.g might say ‘device not found’ ) type adb install C:{myOutputFolerLocation}MyApp.apk


Still happy, its all installed load it up and…nothing…hmmm.  Its stuck on the blue loading screen. It works fine as a webapp from Architect, packager didn’t show any errors. Well below is a list of the issues I had. You may have been lucky and got it to work first time – but not me.

Stuck on blue loading screen?

app.json file contains the following

/**
* Build options
*/
“buildOptions”: {
“product”: “touch”,
“minVersion”: 3,
“debug”: false,
“logger”: false
},

The logger false should be a string, so “logger”: “false”

STILL getting a blue loading screen.

Have you installed Ruby & Compass?
No – well why would you, nothing specifies that you should when you installed Architect. What’s more when you package your app there will be no warnings that you don’t have Ruby or Compass.

Go to these pages and you will find a Ruby installer (do this first), then install Compass
http://rubyinstaller.org/
http://thesassway.com/beginner/getting-started-with-sass-and-compass

What’s that I hear you saying – its still not working!

Are you getting the error –  failed to find meta class definition for name.  Yes then at some point you’ve created a class that was added as a requirement, then found out that you didn’t actually need it and deleted the file.  Architect left the name inside my main application JS file (inside views: [ ] of app.js ).  I used notepad to search for all instances of class name that I had deleted, then I removed them manually from all files. (including the metadata/Application file).  There may have been a way to do this with Architect, but as I was using notepad++ to search everything in the folder structure I just used that.

Finally

Have you left in any lines of code that say debugger;
It doesn’t like those, they’re reserved words and no it will not remove them just because you tell it to build a production version of the app 🙁

Get rid of them.  Now go do another package from inside Architect, then use adb to install APK and BINGO it worked.

PHEW.

For reference:

http://developer.android.com/tools/index.html

different API levels can be found here – http://developer.android.com/guide/topics/manifest/uses-sdk-element.html

Having trouble using adb to connect to your Nexus 7 (says device not found) – then check out this helpful tutorial on that. http://zacktutorials.blogspot.ca/2012/08/nexus7-android-development.html

[ad name=”ad-1″]

Sencha – models and stores only showing one item

Sencha – models and stores only showing one item

I’ve started to look at Sencha Ext JS and Touch and well so much to go on about but if I start on about it I’ll probably never actually get around to finishing this post so I’m going to try and keep them (my posts) short, to the point and frequent (hah I always say that to myself!) as I learn and find out more stuff about it.

So first tip – Do you only see one item in your list? If so the following may help.

Having created a model (which in Flex terms is a VO essentially – Value Object). I then created a Store. This is where you can load any data or hard code it for testing things before you create a web service or similar.

You then create a view with say a list in it. Then tell the list what Store to use by referring to its id. This will link up the store (with the data) and the store is linked to the model. You run the app and you will only see one item in the list. Which would be fine if the data only had one item, but it doesn’t.
(You’ll know what I’m meaning without going into more details if you have this problem, if not just comment)

In order to make the list show more than just the last item of data you must give your model an idProperty other than the default of ‘id’.

Very annoying and their may well be a good reason for it, I just haven’t found it yet. If you’re reading this, feel free to tell me why. As I learn Touch, I’ll hopefully be adding my experiences here.

[ad name=”ad-1″]

Sending mail with PHP, PEAR & Godaddy

Sending mail with PHP, PEAR & Godaddy

I created a very small php file to send email messages which would get called from my app. Everything worked just fine testing locally, then I deployed it to my godaddy account and it wouldn’t work. If you try to goggle specific topics for info on getting something like PEAR PHP mail to work on godaddy you’ll find it hard to come by. Hence this post.

The forum help from godaddy is OK, but more often than not they tell you why you’re having issues. So you still have to figure out how to fix it (which is good in some ways as well – don’t learn unless you figure it out yourself sometimes).

So this is the code that will work when you test locally and as it comes from my machine the mail request gets seen as a client connection (same as say outlook etc) and not as a web server. This is why you need to change the code when you deploy to a web server.

";
$to = "Mrs Jones ";
$subject = "What's up";
$body = "Hi,nnHow are you? What is happening";
 
 $host = "smtpout.secureserver.net";
 $username = "[email protected]";
 $password = '************';
 
 $headers = array ('From' => $from,
   'To' => $to,
   'Subject' => $subject);
 $smtp = Mail::factory('smtp',
   array ('host' => $host,
     'auth' => true,
     'username' => $username,
     'password' => $password));
 
 $mail = $smtp->send($to, $headers, $body);
 
 if (PEAR::isError($mail)) {
   echo("

" . $mail->getMessage() . "

"); } else { echo("

Message successfully sent!

"); } ?>

So here is the code that will work when you deploy it to your server on godaddy, this may well be the same as other server providers.

";
$to = "Mrs Jones ";
$subject = "What's up";
$body = "Hi,nnHow are you? What is happening";

$headers = array (
    'From' => $from,
    'To' => $to,
    'Subject' => $subject);

 $smtp = Mail::factory('smtp' );

 $mail = $smtp->send($to, $headers, $body);
 
 if (PEAR::isError($mail)) {
   echo("

" . $mail->getMessage() . "

"); } else { echo("

Message successfully sent!

"); } ?>

So as you can see I’ve totally removed the host, username, password. This will work providing you have the following lines inside you php.ini or php5.ini file.


SMTP = relay-hosting.secureserver.net
smtp_port = 25

If you do try and use the first piece of code on the webserver it will warn you about being unable to connect. for example,
Warning: fsockopen() [function.fsockopen]: unable to connect to {some ip address} (Connection refused) in /usr/local/lib/php/Net/Socket.php on line 108
unable to connect to smtp server.

[ad name=”ad-1″]

Stop the mobile ActionBar from transitioning

Stop the mobile ActionBar from transitioning

I was creating a mobile AIR app and the app was to have an ActionBar at the top and depending on the view that was about to get pushed I didn’t want the ActionBar to have a transition effect. Sounds like a simple request, nope, no can do…

So after a bit of digging into the various classes ( mainly the ViewTransitionBase ) I came across what needed to be changed 🙂 but its a mx_internal so use the following fix with caution.

All of the various effects check the actionBarTransitionMode while they create the effects.  Its just that the actionBarTransitionMode is always set to ACTION_BAR_MODE_FADE_AND_SLIDE and never changes from that value. What’s more the actionBarTransitionMode is a mx_internal  variable so you can’t just call it yourself when creating a new effect.

So here is the fix.

  1. Extend whatever effect you wish to use. e.g. SlideViewTransition
  2. add the following lines to your extended class import import mx.core.mx_internal; and use namespace mx_internal;
  3. Either inside your constructor set the value (if you don’t wish to change it at runtime) or create a setter to modify the value actionBarTransitionMode
Possible values are (these can be found in the ViewTransitionBase class),

ACTION_BAR_MODE_FADE:String = “fade”;

ACTION_BAR_MODE_FADE_AND_SLIDE:String = “fadeAndSlide”;

ACTION_BAR_MODE_NONE:String = “none”;

In my case I set it to ACTION_BAR_MODE_NONE as I didn’t wish to have any transition on the ActionBar.

[ad name=”ad-1″]

Sencha touch – IDE??

Sencha touch – IDE??

Being a Flex dev for a number of years and deciding that its about time I try out something new and seeing all the hype surrounding Sencha touch I spent a week too two weeks looking at it. It comes across like it is aiming at a very similar market to Flex so I was quite excited about trying it.
Version 2 was just out and it had some path issues for installing etc but the guys at Sencha appeared to be working very hard to get rid of all the little issues and these are now resolved. So I tried to find an IDE/plugin or similar that would allow me to code in the same way as I do Flex/Actionscript.

I tried Netbeans, Webstorm, Aptana, various Eclipse with javascript plugins and quite a few others that I can’t quite remember but NONE of them gave me a similar experience as Flex/Flashbuilder. As in code completion, catching errors etc. I know that javascript is really slack (in a similar way that AS2 was) but when you try something for the first time a good IDE is worth its weight in gold for helping to learn. The Sencha docs are also really good, but why should I have to keep looking at them to see what features are available for the components I want to use.

As I was a real newbie with javascript & Sencha I decided to go to a boot camp & conference on Sencha to speed up my learning, thinking that I’d see what tools they used as there must have been something out there which would make creating Sencha apps feel like programming and the answer was NO!

I did find out how much Chrome is a great tool for web programmers, but it really doesn’t cut it compared to normal development. Brackets from Adobe also sounds like its getting there for web/Javascript development, but its not aimed at Sencha.


SO, after the courses and testing of Sencha I decided that I’d NOT touch it again until it had a decent IDE or plugin for an IDE. Well it looks like the guys at Sencha have listened and they have a beta out for an Eclipse plugin. http://t.co/PYpC1WJf  Its a private enrolement at the moment, but fingers crossed 🙂


I said at the time that I didn’t think Sencha wasn’t quite ready, but with an IDE and Sencha Architect (which I really liked, its like a working version of Flashbuilder in design mode) I’m willing to give it another go. Here’s hoping they let me in to give it a test.

[ad name=”ad-1″]

Debugging facebook apps locally (web based ones)

Debugging facebook apps locally (web based ones)

If  you’re wanting to develop a facebook app then there is loads of helpful stuff out there to get you going. Specifically I’d start here if you’re interested http://www.adobe.com/devnet/facebook.html.

But what they don’t tell you is how to debug your app without you having to FTP your files each time you change something. (If your facebook app is based on AIR and not a web app, then this doesn’t matter).

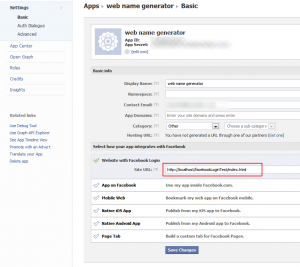
  • Firstly log into facebook and go to your app settings, it will probably look like the below. What you are looking for is the ‘website with facebook login’. This is used by facebook when your app logs in ( you’d never have guess that! ). Anyway if this doesn’t match the url of where your app is deployed then you will NOT be able to log in.

    Change it to your local URL, in my case I’ve made it http://localhost/facebookLoginTest/index.html
    The important bit is the localhost as my actual app isn’t run from index.html but when I set up the app on facebook I just put that in.
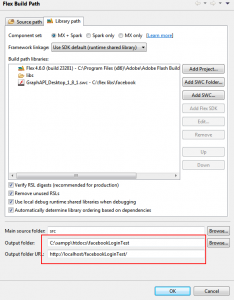
  • Now that your app can login you will now be able to debug, but the default settings in Flashbuilder don’t output your files to your localhost. So this is the second part to getting everything to work.

    I’ve highlighted the two bits you need to change which is inside your projects properties (right click and select ‘Flex Build Path’).

    Change the output folder to push your output files to the folder inside your webserver. I use XAMPP to setup my webserver etc

    Also update the output folder URL, once changed when you hit debug it will load whatever URL is in that box + the html page. So as you can see I’ve changed my output folder URL to http://localhost/facebookLoginTest/ which when I run/debug my app gives me http://localhost/facebookLoginTest/FacebookTestApp.html?debug=true

That’s it.

[ad name=”ad-1″]