Tag: Flex 3

Debugging facebook apps locally (web based ones)

Debugging facebook apps locally (web based ones)

If  you’re wanting to develop a facebook app then there is loads of helpful stuff out there to get you going. Specifically I’d start here if you’re interested http://www.adobe.com/devnet/facebook.html.

But what they don’t tell you is how to debug your app without you having to FTP your files each time you change something. (If your facebook app is based on AIR and not a web app, then this doesn’t matter).

  • Firstly log into facebook and go to your app settings, it will probably look like the below. What you are looking for is the ‘website with facebook login’. This is used by facebook when your app logs in ( you’d never have guess that! ). Anyway if this doesn’t match the url of where your app is deployed then you will NOT be able to log in.

    Change it to your local URL, in my case I’ve made it http://localhost/facebookLoginTest/index.html
    The important bit is the localhost as my actual app isn’t run from index.html but when I set up the app on facebook I just put that in.
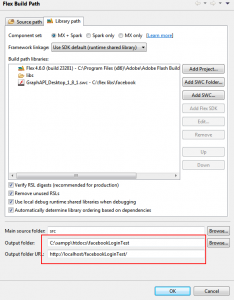
  • Now that your app can login you will now be able to debug, but the default settings in Flashbuilder don’t output your files to your localhost. So this is the second part to getting everything to work.

    I’ve highlighted the two bits you need to change which is inside your projects properties (right click and select ‘Flex Build Path’).

    Change the output folder to push your output files to the folder inside your webserver. I use XAMPP to setup my webserver etc

    Also update the output folder URL, once changed when you hit debug it will load whatever URL is in that box + the html page. So as you can see I’ve changed my output folder URL to http://localhost/facebookLoginTest/ which when I run/debug my app gives me http://localhost/facebookLoginTest/FacebookTestApp.html?debug=true

That’s it.

[ad name=”ad-1″]

Updating bindings when you only change a property inside an Object

Updating bindings when you only change a property inside an Object

Its quite a common thing with Flex and actionscript projects to create an Object and inside that object it will have many properties.  Something in your view will be bound to the object so that the view changes with the object. So long as you change the entire object this will work fine.

Where this doesn’t work is if you change a property inside the object.

So if we have something like this

[Bindable]			
private var myObject : ObjectDataVO;


When we set myObject to something the view component gets updated (great so far).
Lets say the myObject has a property text and the view component uses this to display some visual label, then somewhere in the app I change that property, myObject.text = “something else”;
The binding will not trigger as I haven’t actually changed the myObject, just a property inside it.

So how do we fire the binding manually? Well there is the BindingManager class (note this is an excluded class so you’ll not see it in the autocomplete ).
So in this example if I changed the myObject.text property then I could call

BindingManager.executeBindings( this, ‘myObject.text’, myObject );

This would fire of the binding as if the actual myObject had changed so anything listening in will now get updated.

[ad name=”ad-1″]

3D Cube Component (multi-sided)

3D Cube Component (multi-sided)

After recently posting about an odd effect from putting in a Sin() instead of a Cos(), I’ve manage to finish what I was working on.  Well finish as in it works, but its not a fully customisable component yet.  That will entirely depend on whether or not I get ask to make it into one.

Full Aim  (hopefully coming soon)

The full aim is to create the cube component that can take any number of sides (the example below has 5 sides), each side is a Sprite so that anything can be added.  I’ve made each face/side of the cube a Sprite as the project had to be in actionscript only (the example has some flex in it though) but for the project it was to be used in it had to be pure actionscript as I was handing it over to one of our flash developers to work with in CS4.

Ideally it will be able to rotate in both X or Y directions and have the choice of clockwise or anticlockwise directions, but for now it just rotates around the Y axis and goes in a clockwise direction.

It can already be resized to any size and have any number of side/faces.

The scroll bars could be improved by letting the user define the graphics for them, and if moving it to a flex project I could just use the standard flex scrollbars so that they could be reskinned easily.

Rotation speed and delay are variable as are the easing functions.

The lighting has been taken care of using my first pixelBender file which was interesting to play around with, I’m also going to try and add some blurring depending on the speed of rotation and I think that’s about it.  So it’s pretty much there 🙂

Example

To illustrate the example I’ve added 5 faces –

  1. Rotating cube example
  2. Funny video
  3. Image (png)
  4. blank purple Sprite
  5. Floaty, throbbing yellow circles (with no background)

Mouse over the example to have the cube stop spinning and use the scrollbars to control the cube.

[kml_flashembed fversion=”10.0.22″ movie=”/flex/MultiCube/BannerTestArea2.swf” targetclass=”flashmovie” publishmethod=”static” width=”300″ height=”500″]

Get Adobe Flash player

[/kml_flashembed]


Enjoy, now that I’ve done this I might actually get around to doing a tutorial on some 3D stuff + maybe a bit of pixel bender.

[ad]

Flex / Flash 10 3D examples

Flex / Flash 10 3D examples

I’ve been doing a bit of R&D around the new 3D features in flash 10 for my work recently and seeing as there is very little info/tutorials out there on the subject I thought I’d add what I’ve found out.

Firstly I’ll just post some of the examples I’ve done and I’ll create a step by step guide next.

Example 1 is a simple VBox that rotates on its Z-axis (if you try to just rotate a container or similar in flex 3 it will rotate around the registration point, which isn’t exactly very useful in most circumstances). So you have to use the new Matrix3D class.
Should you come across this post before I create the tutorial, key points to note
You must translate the object in reference to its parent container
Take a copy of its 3D matrix before you do anything, then only apply transformations on that matrix.

Example 2, the obligatory spinning cube without textures.

Example 3, the obligatory spinning cube with textures. Again if you’re looking at this before I do a tutorial on the subject take note
You must add 24 vertexes (4 for each side) for the bitmap textures to map properly using the uvt data. This caught me out for ages as a cube really has 8 vertexes and I was reusing the same points when building the cube!


[ad]