Category: mobile

Stop the mobile ActionBar from transitioning

Stop the mobile ActionBar from transitioning

I was creating a mobile AIR app and the app was to have an ActionBar at the top and depending on the view that was about to get pushed I didn’t want the ActionBar to have a transition effect. Sounds like a simple request, nope, no can do…

So after a bit of digging into the various classes ( mainly the ViewTransitionBase ) I came across what needed to be changed 🙂 but its a mx_internal so use the following fix with caution.

All of the various effects check the actionBarTransitionMode while they create the effects.  Its just that the actionBarTransitionMode is always set to ACTION_BAR_MODE_FADE_AND_SLIDE and never changes from that value. What’s more the actionBarTransitionMode is a mx_internal  variable so you can’t just call it yourself when creating a new effect.

So here is the fix.

  1. Extend whatever effect you wish to use. e.g. SlideViewTransition
  2. add the following lines to your extended class import import mx.core.mx_internal; and use namespace mx_internal;
  3. Either inside your constructor set the value (if you don’t wish to change it at runtime) or create a setter to modify the value actionBarTransitionMode
Possible values are (these can be found in the ViewTransitionBase class),

ACTION_BAR_MODE_FADE:String = “fade”;

ACTION_BAR_MODE_FADE_AND_SLIDE:String = “fadeAndSlide”;

ACTION_BAR_MODE_NONE:String = “none”;

In my case I set it to ACTION_BAR_MODE_NONE as I didn’t wish to have any transition on the ActionBar.

[ad name=”ad-1″]
Sencha touch – IDE??

Sencha touch – IDE??

Being a Flex dev for a number of years and deciding that its about time I try out something new and seeing all the hype surrounding Sencha touch I spent a week too two weeks looking at it. It comes across like it is aiming at a very similar market to Flex so I was quite excited about trying it.
Version 2 was just out and it had some path issues for installing etc but the guys at Sencha appeared to be working very hard to get rid of all the little issues and these are now resolved. So I tried to find an IDE/plugin or similar that would allow me to code in the same way as I do Flex/Actionscript.

I tried Netbeans, Webstorm, Aptana, various Eclipse with javascript plugins and quite a few others that I can’t quite remember but NONE of them gave me a similar experience as Flex/Flashbuilder. As in code completion, catching errors etc. I know that javascript is really slack (in a similar way that AS2 was) but when you try something for the first time a good IDE is worth its weight in gold for helping to learn. The Sencha docs are also really good, but why should I have to keep looking at them to see what features are available for the components I want to use.

As I was a real newbie with javascript & Sencha I decided to go to a boot camp & conference on Sencha to speed up my learning, thinking that I’d see what tools they used as there must have been something out there which would make creating Sencha apps feel like programming and the answer was NO!

I did find out how much Chrome is a great tool for web programmers, but it really doesn’t cut it compared to normal development. Brackets from Adobe also sounds like its getting there for web/Javascript development, but its not aimed at Sencha.


SO, after the courses and testing of Sencha I decided that I’d NOT touch it again until it had a decent IDE or plugin for an IDE. Well it looks like the guys at Sencha have listened and they have a beta out for an Eclipse plugin. http://t.co/PYpC1WJf  Its a private enrolement at the moment, but fingers crossed 🙂


I said at the time that I didn’t think Sencha wasn’t quite ready, but with an IDE and Sencha Architect (which I really liked, its like a working version of Flashbuilder in design mode) I’m willing to give it another go. Here’s hoping they let me in to give it a test.

[ad name=”ad-1″]

StateGroups – finally found a use for them

StateGroups – finally found a use for them

State groups? Ever looked at them and though they look really useful but then can’t find a good use for them!
Well last year (yes its taken a while to finish of this post – hopefully its worth it), while developing some mobile apps I came across a great use for them. At the time their were also very few examples of using stategroups on-line and none in a practical setting.
So here goes, lets see how they’re done and where would be good to use them.

  • The problem
  • Mobile apps can have 1 of 3 DPI settings and this will change how your app looks. (320 DPI, 240 DPI and 120 DPI).
    So we can think of each of these DPI’s as a state.
    Then we can have a view and like most views you will use states. For example to have “Edit mode on” and “Edit mode off”.

  • That give is 2 different groups of states
  • Group 1 is the DPI setting.
    Group 2 is the view mode.

  • Soloution
  • I always like to see working examples of something, bit like a picture & a 1000 words.
    So below is a test app to change the values of and of course it has source code to view.


Click to open state group examples

I’ve also included below what I consider to be the important bits of the code to understand.
Check out the source code of the app for more detail.


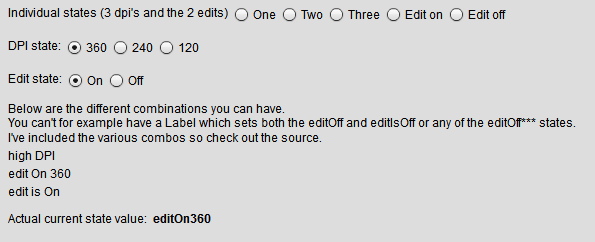
These are the various combinations of states you can use together, and the list of the actual states.
For example you can’t set text.one and text.lowDPI on the same component.

Hopefully this will give you a bit of insight into how and where to use stateGroups. Very useful tool under specific circumstances.

[ad name=”ad-1″]

Good day in the office – 1000’s of mobile apps built in a few hours!

Good day in the office – 1000’s of mobile apps built in a few hours!

Yeah its been ages since I’ve last blogged any code articles (got a few 1/2 done – honest!). Just been very busy in the past several months working with the crew from Jampot. Anyway check out this article where we headline in Engadget. Shows off our new product which can let you build an app in minutes and get it installed on your phone.

Jampot crew

Check out the actual Engadget article here.
Check out the fab Jampot team here 🙂
And of course check out this to build an app and get it on your phone in minutes.

[ad name=”ad-1″]

App story – on BBC site. Catch it live at MAX 2011

App story – on BBC site. Catch it live at MAX 2011

The application that I’m working on with the guys at Jampot has made the BBC news. Check out the article from the BBC.
http://www.bbc.co.uk/news/uk-northern-ireland-15075450

Also the guys are heading over to the Adobe Max 2011 conference so you’ll be able to see it live and see how easy it is to create a mobile app for all mobile platforms.

[ad name=”ad-1″]

iOS – Mobile dev, make sure you flush when you’re done.

iOS – Mobile dev, make sure you flush when you’re done.

Developing for Apple’s devices can throw up a few little quirks that don’t happen when using Android devices.

This one happens if you are using shared objects to store information between sessions.
Basically, you should always call the flush mechanism whether you are adding more data to the shared object or if you are deleting something from the shared object.

What you find is if you have a shared object ‘shared’ with a value shared.data.firstValue = “something”, then you delete that value using

delete shared.data.firstValue;

if you try to access the value firstValue you will get null.
This is exactly what I’d expect.

Then lets say you exit the app and you either kill the app from running in the background or iOS stops it. Then the next time you load the app and access the shared object shared.data.firstValue you will get back “something” and not null.

You must flush the shared object for it to be stored locally, otherwise when the app is killed, the local storage will not have been updated.

[ad name=”ad-1″]

IconItemRenderer and LabelItemRenderer, separator lines hardcoded!

IconItemRenderer and LabelItemRenderer, separator lines hardcoded!

Working on a mobile project I needed to create a renderer for a list, so I choose to look at the IconItemRenderer which extends the LabelItemRenderer. These have been optimised for mobile use so it seemed a reasonable place to start. On the whole they seem like good classes to use, but if you’ve ever worked with the Datagrid/DataGridBase in the past you will probably know about the white square which comes about from the hardcoded #FFFFFF values inside the DataGridBase!

Well the IconItemRenderer and LabelItemRenderer have a similar issue. So lets just say you create a list and you wish to skin the list exactly how you like or use it in a tile layout or something other than vertical then you will find some lines above and below your renderers which look out of place. You can’t get rid of them no matter what property styles you set.

The fix is pretty straight forward but why does there have to be some hardcoded values in something that is meant to be very versatile?

So inside the LabelItemRenderer around lines 881 you will see the following. It uses these values to draw separators whether you like it or not.

// separators are a highlight on the top and shadow on the bottom
topSeparatorColor = 0xFFFFFF;
topSeparatorAlpha = .3;
bottomSeparatorColor = 0x000000;
bottomSeparatorAlpha = .3;

So the quickest way of dealing with this is to override the drawBackground function in your own class which is created in LabelItemRenderer. This doesn’t get called from IconItemRenderer so you can quite simple copy the entire function and just remove the separator chunk and do not call super from your function which overrides the drawBackground.

Better still would be to change the hard coded values to styles from a CSS file.

var topSeparatorColor : uint = getStyle( 'topSeparatorColor' );
var topSeparatorAlpha : Number = getStyle( 'topSeparatorAlpha' );
topSeparatorAlpha = isNaN( topSeparatorAlpha ) ? 1 : topSeparatorAlpha;

If you’re setting a Number just remember to check for NaN’s in case you haven’t set a style, uints default to 0 anyway.

[ad name=”ad-1″]